Creating compelling images in a controlled environment requires more than just a good camera and an artistic eye. The right studio lighting equipment transforms ordinary setups into professional-grade workspaces, allowing photographers to capture stunning portraits, crisp product shots, and dynamic commercial imagery. Whether you are just starting out or looking to expand your capabilities, understanding the fundamental components of a lighting kit proves essential. From the sturdy foundations provided by light stands to the soft, diffused glow of umbrellas, each element plays a vital role in shaping the final image. Building a versatile multi-light configuration might seem daunting at first, but mastering the basics of tripods, umbrellas, and their integration into cohesive setups opens up a world of creative possibilities.
Building your foundation: understanding studio lighting tripods and support systems
Every great lighting setup begins with a solid foundation, and that foundation is your tripod or light stand. These support systems are the unsung heroes of photography equipment, holding your flash lighting, LED lighting, or continuous lighting units exactly where you need them. Without reliable stands, even the most expensive strobe lighting or advanced lighting modifiers become nearly impossible to position effectively. When selecting light stands for your studio, stability should be your primary concern. A wobbly stand not only risks damaging your equipment but also makes it difficult to maintain consistent lighting angles throughout a session.
Choosing the Right Tripod Height and Stability for Studio Environments
Height and stability go hand in hand when it comes to selecting the perfect light stand for your studio. Most photography lighting setups require stands that can reach at least 240 centimetres, providing enough elevation to position your key light above the subject when needed. For instance, an air-cushioned stand capable of holding up to five kilograms offers excellent stability whilst protecting your equipment during adjustments. The air cushioning feature ensures that when you loosen the stand to lower it, the light descends gently rather than dropping suddenly, which could damage delicate lighting equipment or cause injury.
For heavier setups involving larger softboxes or beauty dishes, consider upgrading to a C-stand. These robust supports can typically hold around ten kilograms and provide exceptional stability even when extended to three metres. Their wider base and unique locking mechanism make them ideal for positioning rim light or fill light in complex three-point lighting configurations. When working with overhead lighting, a boom stand becomes invaluable. These specialised stands feature an extendable arm that allows you to position your light directly above your subject without the stand's legs appearing in the frame, a common issue when shooting product photography or certain portrait styles.
Adjustable Stands versus Fixed Tripods: Which Support System Works Best for Your Setup
The debate between adjustable stands and fixed tripods often comes down to the specific needs of your photography practice. Adjustable stands offer remarkable versatility, allowing you to change the height and sometimes the angle of your lighting equipment quickly. This flexibility proves particularly useful when switching between different lighting patterns such as Rembrandt lighting, butterfly lighting, or loop lighting, each requiring distinct light placement. An adjustable stand that can hold at least four kilograms provides a good starting point for beginner photography, accommodating most speedlite units and smaller softboxes.
Fixed tripods, whilst less flexible in terms of height adjustment, often provide superior stability for permanent studio setups. If you frequently shoot with the same lighting configuration, fixed stands can save time and reduce the risk of accidental adjustments between sessions. However, for those building a dynamic studio where different types of shoots demand varying setups, investing in adjustable light stands makes more sense. Many photographers find that a combination of both types serves them best: using fixed stands for their most common lighting positions whilst keeping a few adjustable stands available for creative experiments or special requirements.
Umbrella lighting techniques: maximising light diffusion and quality
Umbrellas remain one of the most popular and effective lighting modifiers in photography, prized for their simplicity, portability, and ability to create beautifully diffused light. These essential tools transform harsh, direct flash lighting into soft, flattering illumination that wraps around your subject. Unlike more complex lighting modifiers, umbrellas require minimal setup time and work brilliantly with battery flash, mains flash, and even continuous lighting sources. Their affordability makes them particularly attractive for student photography and those just beginning to build their lighting kits.
Reflective versus Shoot-Through Umbrellas: Selecting the Proper Modifier for Your Subject
Understanding the difference between reflective and shoot-through umbrellas helps you choose the right tool for each photographic situation. A reflective umbrella features an opaque outer surface and a reflective interior, typically in silver, gold, or white. You position your light source facing into the umbrella, which bounces the light back towards your subject. This setup provides more controlled and directed illumination compared to shoot-through options, making reflective umbrellas excellent for situations where you need to minimise light spill or when working in smaller studio spaces. The silver interior produces crisp, slightly cooler light with more contrast, whilst white interiors create softer, warmer tones.
Shoot-through umbrellas, also known as translucent or white umbrellas, work differently. You aim your light source through the umbrella towards your subject, using the umbrella's translucent fabric to diffuse the light. This approach creates extremely soft, wraparound lighting that reduces harsh shadows and produces a flattering effect for portrait photography. The trade-off is less control over light direction, as the illumination spreads more broadly. A forty-two-inch white translucent umbrella represents a versatile starting point, offering enough surface area to create beautiful soft light without becoming unwieldy in compact studio environments. When choosing between these options, consider that reflective umbrellas work better for high-key photography where you need to maximise light output, whilst shoot-through umbrellas excel in creating gentle, natural-looking illumination for portraits.
Positioning Your Umbrella Lights for Optimal Portrait and Product Photography Results
The positioning of your umbrella lights dramatically affects the mood, dimension, and quality of your final images. For classic portrait work, placing your umbrella-equipped key light at approximately forty-five degrees to the side of your subject and slightly above eye level creates dimension and depth. This angle produces attractive shadows that define facial features without becoming overly dramatic. The distance between your light and the umbrella, as well as the distance from the umbrella to your subject, both influence the quality of light. Moving the light source closer to the umbrella increases the effective size of your light source, creating softer shadows, whilst moving the entire setup closer to your subject further enhances this softening effect.
In product photography, umbrella positioning requires different considerations. When photographing reflective or metallic items, a white translucent umbrella positioned above and slightly behind the camera creates even, shadowless illumination that minimises unwanted reflections. For products with texture or dimension, using two umbrellas in a clamshell configuration—one above and one below the subject—produces beautifully even lighting that reveals detail without harsh shadows. Adding a third umbrella as a rim light, positioned behind and to the side of the product, creates separation from the background and adds visual interest. Experimenting with umbrella placement whilst observing the results in real-time, particularly when using continuous lighting or LED lighting, allows you to refine your technique and develop an intuitive understanding of how light behaves.
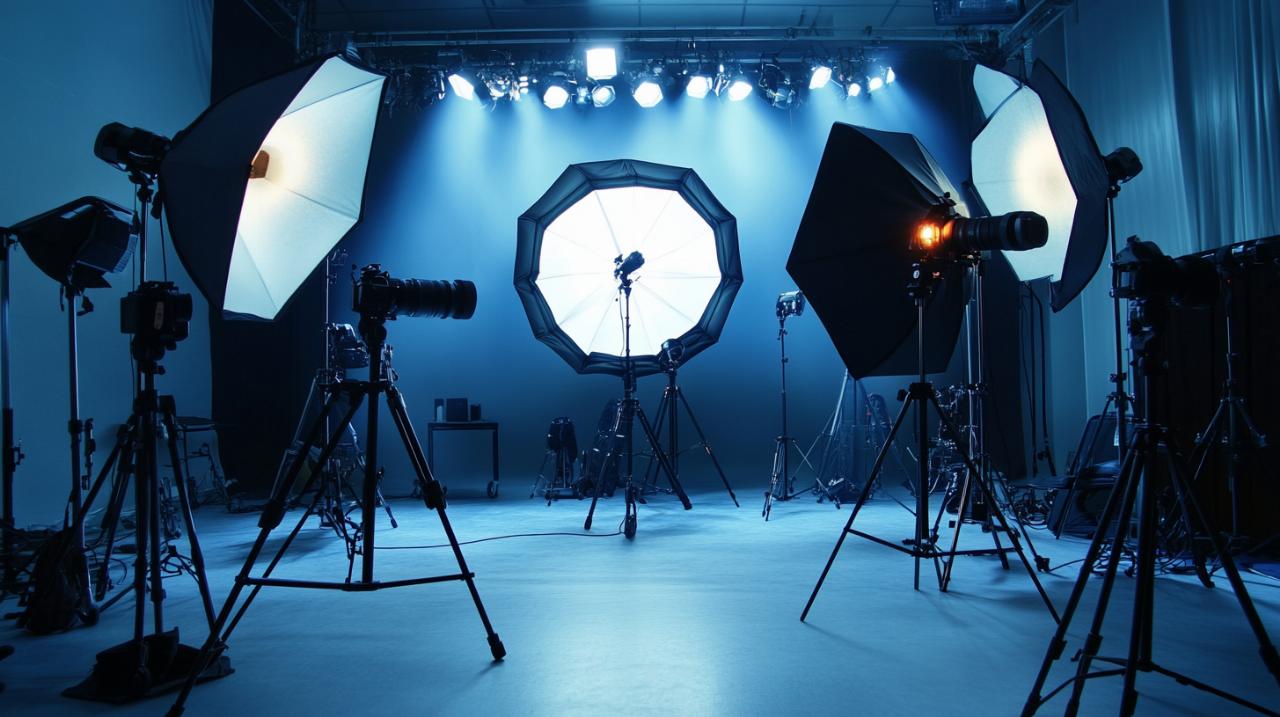
Creating professional multi-light configurations with complete studio kits
Moving beyond single-light setups opens up endless creative possibilities and represents a crucial step in developing your photographic skills. Multi-light configurations allow you to control not just the brightness but also the direction, quality, and mood of your images. A complete studio lighting kit typically includes multiple light sources, various lighting modifiers such as softboxes and umbrellas, reliable light stands, triggers for wireless operation, and often a selection of backdrops. These comprehensive kits remove the guesswork from building a compatible system, ensuring that all components work together seamlessly.
Three-point lighting setups using tripod-mounted umbrella systems
The three-point lighting technique represents the foundation of professional studio lighting and demonstrates perfectly how umbrellas and tripods work together to create polished results. This classic setup uses three distinct lights, each serving a specific purpose: the key light, fill light, and rim light. Your key light, typically the brightest and most prominent, establishes the primary illumination and mood. Mounting a four-hundred-watt mains flash with a ninety-centimetre octagonal softbox or a white umbrella on a sturdy air-cushioned stand creates an excellent key light. Position this light at roughly forty-five degrees to one side of your subject and slightly elevated to create dimension.
The fill light counterbalances the shadows created by your key light, ensuring detail remains visible in darker areas without eliminating shadows entirely. A second light, often set at lower power than your key light, equipped with a white translucent umbrella works beautifully as a fill light. Place this on the opposite side of your subject from the key light, also on an adjustable stand for precise positioning. The rim light, sometimes called a hair light or separation light, sits behind your subject, aimed towards the back of their head or shoulders. This light, which might be a speedlite or smaller battery flash mounted on a boom stand to keep the tripod legs out of frame, creates a subtle highlight that separates your subject from the background, adding depth and polish to the final image.
Expanding your kit: combining multiple light sources for commercial photography applications
As your skills and ambitions grow, expanding beyond basic three-point lighting opens doors to commercial photography applications that demand more sophisticated lighting control. A comprehensive kit might include two or three six-hundred-watt battery-powered portable TTL monolight strobes, providing the power and flexibility needed for larger sets or outdoor location work. Combining different lighting modifiers within a single setup allows you to craft precisely the look you envision. For instance, you might use a rectangular strip softbox measuring thirty by ninety centimetres as your key light to create dramatic, directional illumination on a fashion portrait, whilst employing white umbrellas for fill lights to maintain soft, even illumination in shadow areas.
Adding specialised modifiers like beauty dishes to your umbrella-based setup introduces yet more creative options. A forty-two-centimetre silver beauty dish creates concentrated, crisp light perfect for highlighting specific areas or creating dramatic portraits with defined shadows. Incorporating reflectors, particularly versatile five-in-one reflectors that offer white, silver, gold, black, and translucent surfaces, allows you to manipulate light without adding more powered sources. The black surface subtracts light, deepening shadows for more dramatic effects, whilst silver and gold surfaces bounce light to fill shadows or add warmth. Building a collection of wireless triggers ensures reliable communication between your camera and multiple strobe lighting units, essential when working with complex setups. Modern TTL triggers even allow app control and touchscreen interfaces, making adjustments quick and intuitive during fast-paced commercial shoots. Investing in quality vinyl backdrops or collapsible backdrops in white, grey, and black provides the clean, professional backgrounds that commercial work demands, completing your transition from enthusiast to professional-level photographer.